
- Home
- Deceptions
- Solar
- Thermal Audit
- Ventilation
- Sensors
- Governance
- Environment
- Reference
- Contact
- News
Infrared Imaging of Ceilings
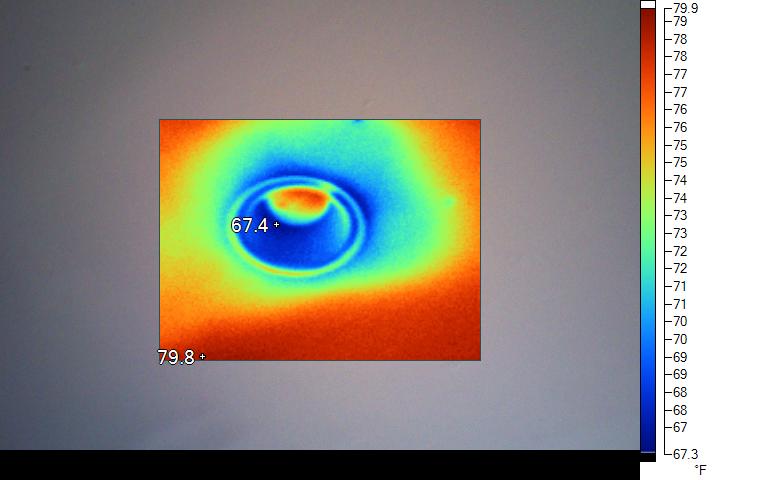
Ceiling openings for pot lights are often a source of heat loss through the attic. The photo below shows a large cold area around the light. The bulb is not on, but looks warm because incandescent light bulbs have a vacuum inside, are excellent insulators and warm up to room temperature.
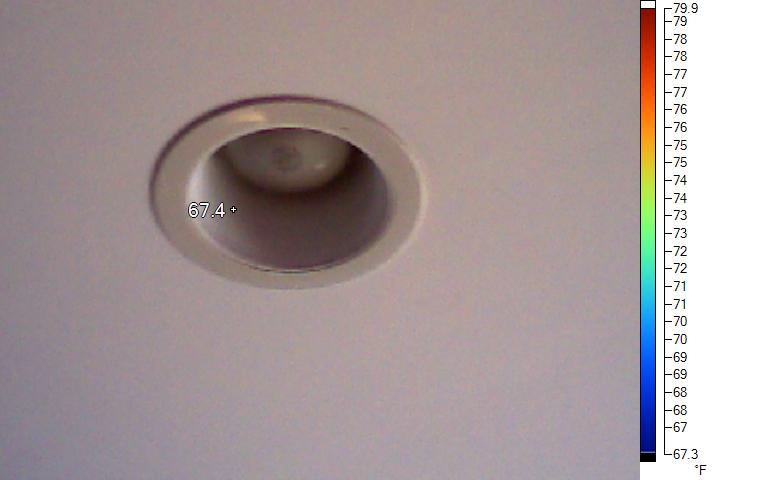
Here is the same image with the infrared overlay disabled, for reference.
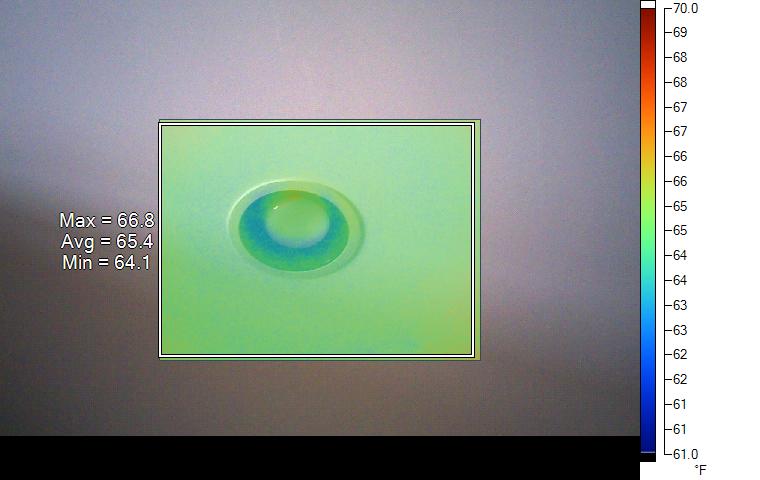
This next image is from a very well insulated ceiling. The ceiling lights are the same temperature as the rest of the ceiling. The temperature difference here appears to be about 2°F whereas the picture above had a 12°F difference. When cellulose or other loose insulation is blown into a ceiling to a depth of 10 inches or more, the ceiling studs are not visible at all. Light fixtures will show up but primarily because of they have different emmissivities from the ceiling plaster and fool the camera.
Recessed ceiling lights have housings that are inserted behind a hole in the plaster as follows:

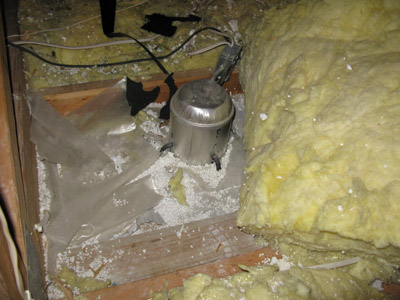
As you can see, there is no seal between the metal fixture and the ceiling plaster, so unless steps are taken to seal the assembly, hot air will leak into the attic in the winter. Insulations like cellulose are effective in sealing these gaps. The next photo shows what caused the radical difference in the first picture. This is a picture taken in the attic above the fixture. The insulation was not pulled back for the photo -- it was found like this.
- Ensure the light fixture is rated for direct contact with insulation (IC or insulation contact). The insulation contact variety are usually double walled and thermally protected with a fuse. It is possible to retrofit non-insulation-contact lamp housings with an additional protective housing, but you must consult local building codes. Some codes for example require a drywall box to be constructed around it, or do not allow them to be used at all. Here is a typical code from Minnesota: NEC 410.66 Recessed lighting fixtures installed in insulated ceilings or installed within 1/2” of combustible material shall be approved for insulation contact and labeled Type IC. The Minnesota Energy Code, part of the State Building Code, required penetrations into exterior walls and ceilings to be sealed to prevent the leakage of airborne moisture into unheated spaces. Here is 2008 hearing from Oregon that was considering a ban: "Only Type IC recessed fixtures shall be permitted to be installed in cavities intended to be insulated.". Here is a typical Canadian regulation that errors on the side of safety: Recessed lighting fixtures - The electrical code prohibits the use of recessed lighting fixtures blanketed in thermal insulation because heat build-up can lead to a fire hazard. If these fixtures are to be covered, they must have a thermal protection device with an insulation rating over 90° C to switch them off should overheating occur. In addition, the lighting fixtures must be Canadian Standards Association (CSA) approved for this type of installation. As an additional safety precaution, recessed lighting fixtures should be surrounded, at a distance of not less than 50 mm (two inches), by a box constructed of plasterboard, plywood or other substantial material. The lights or bulbs in the fixture must not exceed the maximum wattage allowable for the particular light fixture. A CSA label does not mean that the light fixture is suitable to be insulated. Check with your local inspection authority or if in doubt, don’t insulate.
- Cut the fiberglass insulation around the light fixture leaving a 3" inch gap around the fixture and roll the batt into position.
- If the can is rated for direct contact with insulation, add additional insulation over the top to increase the R value to meet code for new construction. If this was insulated to a value of R-50 using blown in cellulose (R 3.4 per inch), the insulation thickness would be about 14 inches, and the lamp housings would not be visible from the attic.
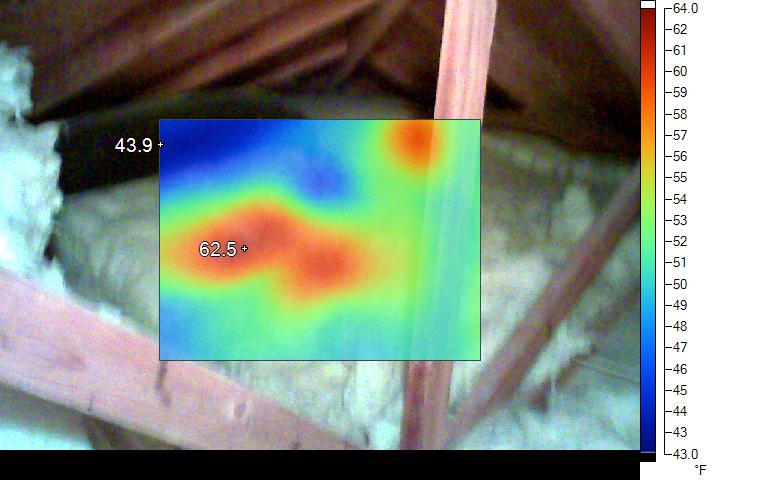
The attic insulation in this home was not evenly distributed. The photo below vividly shows hot spots (during the winter heating season) which would be very difficult to find without a thermal camera. Notice that there is a 20°F difference between the thin and thick areas of insulation and that these correspond to warm and cold spots on the ceiling below. Attic insulation should be evenly applied and thick enough so that the surface of the insulation is very close to the temperature of the attic air.
Recommendations:
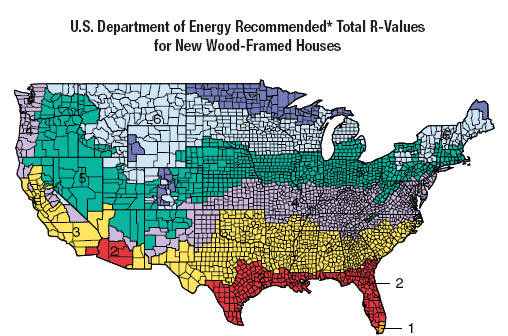
- Insulate your attic with a continuous blanket of insulation. Passive solar homes have about 27 inches (700mm) for an R-value of about 90. The U.S. Department of Energy recommends R30 to R60 depending on your "zone".
- Hire a home auditor to perform a thermal scan so that you can rapidly find any warm or cold spots in the insulation. The infrared photos are required to guide the insulation technicians. Installing large quantities of insulation is expensive. A follow up thermal scan will verify that the additional insulation is installed properly.
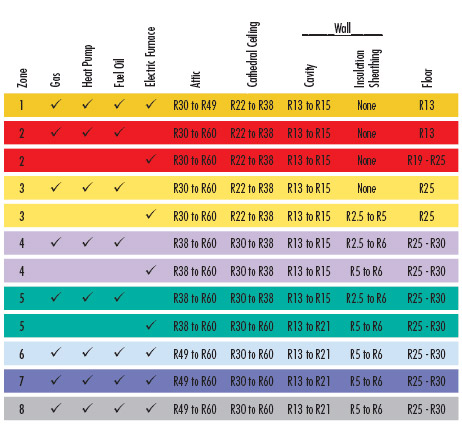
Below for your reference is a zone map and the recommended insulation values. These recommendations are based on current energy costs. If energy was free, all insulation would be a waste of money. Conversely, if insulation was free, you would be wise to insulate to passive home standards. Our recommendation is to insulate to local standards for new construction and if you can afford the additional up-front costs, increase the insulation thickness to passive house standards. While it is not possible to add aditional insulation inside standard 2x4 wooden stud walls, attics have lots of room for a thick blanket of insulation.
-- end --